Introduction
Lot’s of folks new to photography live with the illusion that they can purchase an expensive DSLR and it will automatically get nice pictures for them. Disappointment spreads some days after the buy as the buyer realizes the complexity of their new tool. Overwhelmed with the number of buttons and the complexity of the official DSLR guide booklet, the purchaser gives up. The camera ends up being an opportunity for more ambitious photographers on eBay.
Sounds familiar?
In this DSLR guide, we want to change that and explain, in simple terms, how to get the most out of your expensive purchase.
We recommend you read the rest of this guide with your camera nearby so you can test and confirm where buttons and dials are located in your model.
Hopefully, you will decide to keep your DSLR and enjoy photography.
The basics of DSLR
Understanding the basics of your new DSLR will help set yourself up for success. However, be aware, I’m just mentioning the major settings of a DSLR since I want you to go deeper and practice yourself. If your camera model looks different to the one shown below, don’t be deterred! The settings and buttons I mention in this text are very similar to the camera you own!

A photo of a DSLR camera without the lens attached, showing the camera sensor
Camera Sensor
Every DSLR has a camera sensor. The sensor is the medium that is “recording” your image once you press the shutter button. What was Film in analog photography, is a sensor in digital photography. Most DSLR cameras have an APS-C sensor (cropped-frame) or a full-frame sensor. The bigger full-frame sensor has the same size as a 35mm negative in analog photography.
Why is bigger better? The answer to that lays in enlargement. APS-C sensors are a bit smaller and offer less image quality. Blowing up your image to 100×70 cm from a bigger surface, such as the sensors found on full-frame cameras, will result in better images with more details than enlarging it to the same size from a smaller surface (APS-C). In other words, it’s similar to blowing up a balloon. The vibrant red of the empty balloon will lose it’s intensity once you put air in it.
Tip: Don’t go running to the store to buy a full-frame camera! Your APS-C cropped sensor can take amazing photos!
Shutter button
If you push this button half way down your camera will start focusing and beeping when the desired object is in focus. Push it all the way down to fire your camera. Remember, in most DSLRs, this button is a two-step function. Most beginner DSLR owners press the shutter immediately without much thought as to the first step, focusing.
Practice: Turn on your camera now and aim it at an object. Press the shutter half-way down and observe the lens movement, focus beep, and focus achieved signal (usually a solid green light on your viewfinder, if it is flashing, that means focus was not achieved)
Lens release
Push the lens release button to switch lenses. Hold it down while detaching the lens. When you want to put a new lens to your camera, align the red or white dot on your lens with the dot on the camera’s metal thread.
Practice: Hold the lens release button and remove your lens by turning the lens counter-clockwise. Then put it back on.
DOF preview
What is DOF? In simple terms, DOF (depth-of-field) refers to the focus pane of your shot. Everything inside focus pane will be in focus. Everything before or after the focus pane will be out of focus.
The DOF preview button helps you determine what photos will look like before you push the shutter. Many beginner photographers don’t realize the image they are seeing in the viewfinder does not necessarily have the same depth of field as the image they are about to take. This is because the camera automatically gives a preview of the image at the camera’s lowest possible aperture setting. So if you’re shooting on a narrow aperture, say f/8, on a lens that can stop down to f/1.8, the image in the viewfinder will display at f1.8. That’s a big difference in depth of field from f/8!
However, you can press the DOF button and the lens will stop down to the aperture that you have set. Then, you will be able to see a preview of what the final image will look like through the viewfinder. As depth-of-field defines what areas of your picture stay sharp, the button is good to help show you which elements inside your image are sharp and which ones will fall off to blur.
Practice: Set a higher f-number in your camera such as f/11 and focus on an object around you. Then look through the viewfinder while pressing the DOF preview button. Do you see the focus area change as you release the DOF Preview button?
Pop-up Flash Button
Most DSLR cameras include a built-in pop-up flash. Push the button and the flash on top of your camera will pop up. You can hide the flash again just by pushing it down manually.
Practice: Press the pop-up flash button to release the flash.

Back of a DSLR camera
Hot Shoe
Besides the built-in pop-up flash, every DSLR offers a hot shoe. You can use the hot shoe to attach a more powerful external flash or other gear and accessories to increase the functions of your camera. For example, remote triggers or perhaps a microphone when taking videos. This is usually located just behind the pop-up flash. You can identify it by the metal connectors as shown.
The Viewfinder
Almost needless to say, looking through the viewfinder will allow you to see the image you are about to take. The nice thing on a DSLR is that you actually see through the lens. Thus you can see the final image with high accuracy. Furthermore, looking through the viewfinder, you will find a small display showing the major exposure settings.
As you can see in the viewfinder image below, exposure control shows that, with the settings of ISO800, f4.5 and 1/25 shutter speed, I would underexpose my dog by almost two stops. Also, note the small square (focus point) right next to his leg indicating that I would focus wrong! The square should be on his eye, as I want sharpness there, not on the blanket. Last but not least, you can see how much my dog loves it when I’m writing the blog instead of playing with him.

Look through your viewfinder and identify the numbers shown
LCD Screen
The LCD Screen allows you to see your masterpieces right away just by clicking the small “>” play button! Further, the screen gives you more information about your image. It show’s the chosen exposure setting like ISO, aperture, shutter speed, and many more things. Also, the LCD screen is where you will access your camera’s ever important menu system.
Practice: Take an image and press the ‘Play’ button to view it in your LCD screen.
Live View Switch
Most DSLR’s allow you to compose an image either by looking through the viewfinder or by live view on your LCD screen. Push this button to switch from one view to the other. Although I prefer composing through the viewfinder, live view has a clear advantage: you can check sharpness with an electronic magnifying glass. To switch back (turn off live view) you can press this button once more.
Practice: Press the Live View Switch button a few times to switch between the viewfinder and live view preview (LCD).
Quick Control Dial
The quick control dial has several functions. By turning the wheel you can rush through your pictures in play-mode. While shooting in manual mode, it allows you to change the aperture or the ISO depending on how you set up your camera.
Most of the wheels and buttons are customizable and that’s a good thing! Once you learn to handle the camera you can customize it the way it works best for you. The goal is that your fingers melt with the major buttons of your camera. Most camera bodies have very well thought out ergonomics and, after a while, you will handle them intuitively.
Practice: Press the ‘play’ button and turn the ‘Quick Control Dial’ clockwise and counter-clockwise to go through your photos in LCD. Half press the shutter button to switch back to shooting mode and turn ‘Quick Control Dial’ to see which settings change (look through your viewfinder)
Multi-control
This button, located in the middle of the Quick Control Dial, allows you to jump through the menu. In shooting mode, you will most likely use it to move your focus-point through the viewfinder. Both, multi-control and quick control dial are operated with the thumb.
Practice: Find the AF-point (autofocus point) button (in our example, it is located to the left of the Exposure Lock Button) and press it. This will highlight the current focus point(s). Then use the ‘Multi-control’ button to jump from focus points.
Exposure Lock Button
I love this one! The * allows you to freeze a certain exposure. The most useful tip I ever got for street-photography on a cloudy day was to measure the light on the street. Just point your camera at the asphalt and push the exposure lock. Your camera will remember the luminance of the street and you will get astonishingly correct exposures as the light on the ground is a very steady reference for your light meter.
Tip: after each shot, your memorized exposure will reset. So if you want a specific exposure for the next shot, take exposure again from the desired object by focusing on it and pressing the ‘*’ button, before taking the shot.
Practice: Focus and lock the exposure on a relatively dark object/area. Then take a photo and observe how the camera made the shot bright. Camera locked the exposure so that our dark object/area is well lit. You can do the same with a bright object/area.
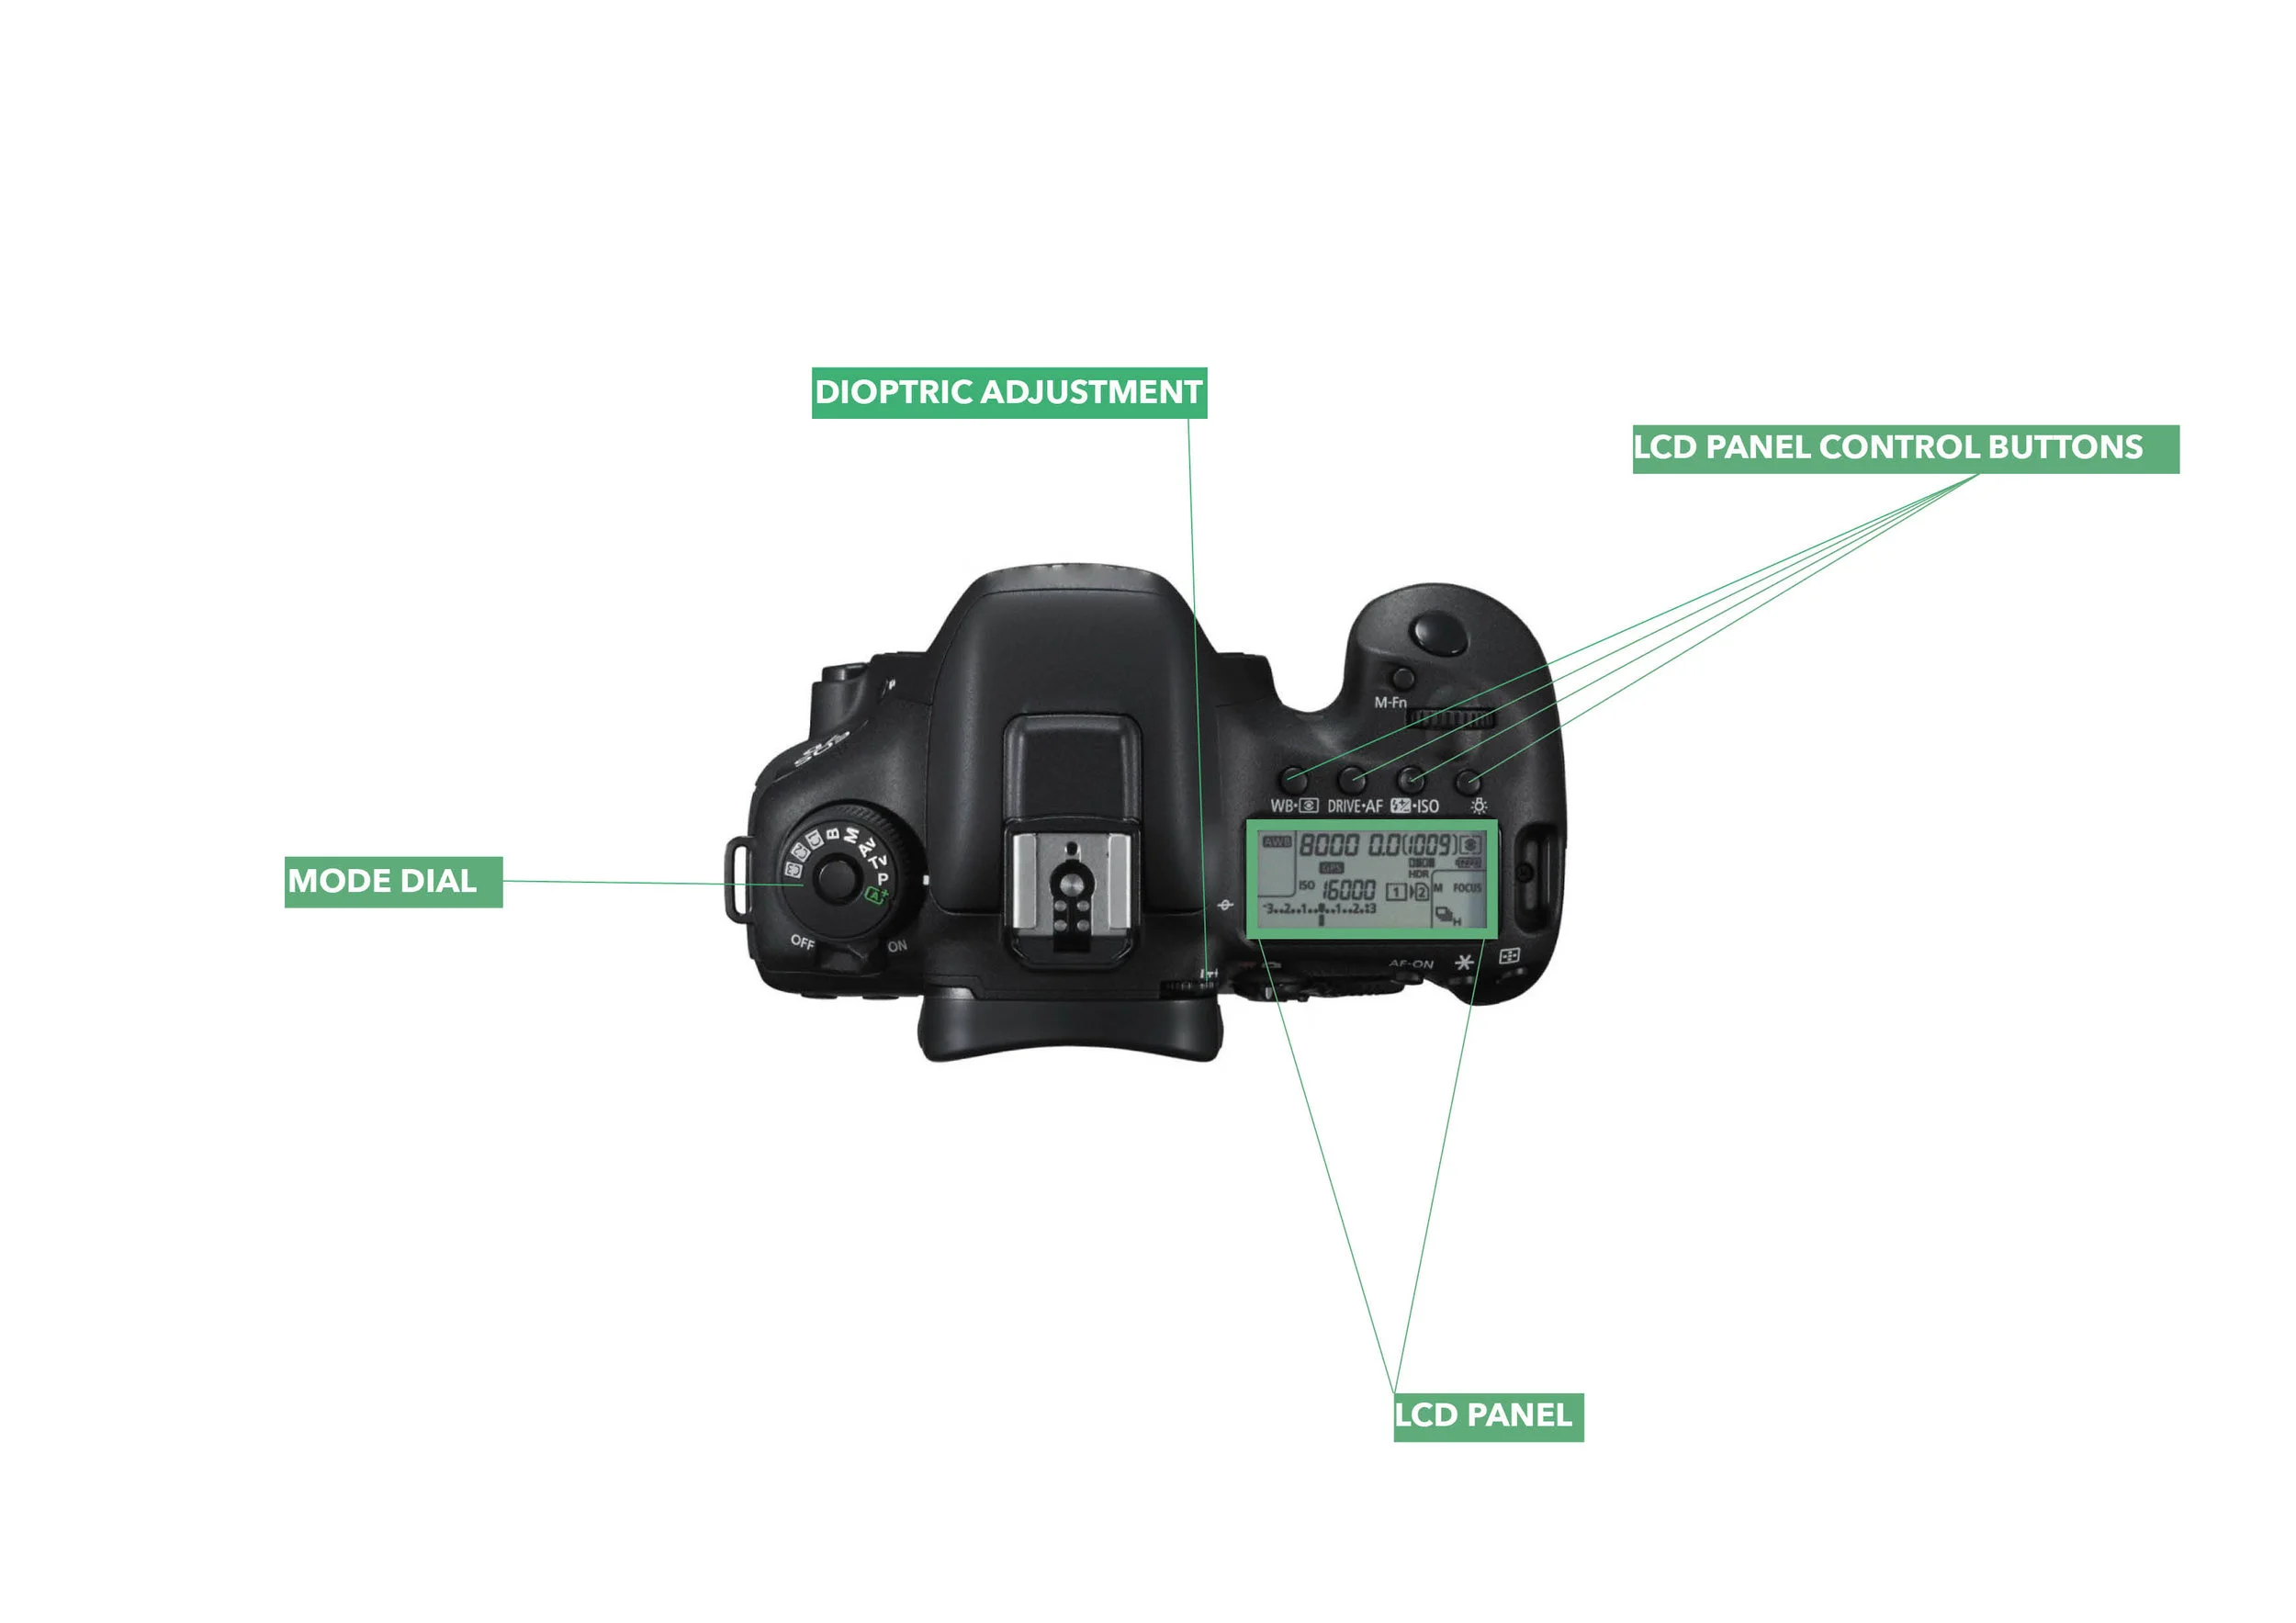
The top view of a DSLR camera
Dioptric Adjustment
Another very helpful feature of your DSLR is the little dioptric wheel. People who normally wear glasses can adjust the wheel to their vision. Another useful tip I got was to remove the rubber eyecup from the viewfinder. It allows you to get closer to the hole and have a better view.
Practice: Look through the viewfinder and adjust the Dioptric Adjustment to see how your focus points go in and out of focus. Set this to a level where focus points are sharp.
Mode Dial
Model dial selects the programming mode for the camera. If you Turn the dial to A+ (AUTO), your camera will automatically choose all the settings for you. However, I’d strongly advise anyone against using this mode as you give away all the responsibility. When shooting in AUTO mode, you are not being creative and run the risk of not getting your desired shot.
All beginner photographers should start using one of the semi-manual or manual modes:
Semi-Automatic Program Mode (“P”)
Shutter Priority Mode (“Tv” on Canon or “S” on Nikon)
Aperture Priority Mode (“Av” on Canon or “A” on Nikon)
Manual Mode (“M”)
Bulb Mode (“B)
The “P” mode and priority modes are autoexposure modes, which means your camera automatically adjust one or more parts of the exposure triangle to achieve the desired exposure. Choose the “M” mode if you want the full control of the camera.
Still feeling confused by what all these modes do? Let’s go into a little more detail since it’s important you know when to use each of the different modes.
Semi-Automatic Program Mode (P)
P stands for program-automatic. Here the camera chooses aperture and shutter speed for you as soon as you press your shutter half way down. Since you can still change the aperture/shutter speed combination by turning the wheel right next to the shutter button, the P-Mode is superior to the fully automatic mode. If you are still using automatic mode, you may want to start with this mode to see how aperture and shutter speed affect your photos.
Shutter Priority (Tv/S)
In this mode, you choose the shutter speed manually. Depending if you want longer exposures times to show motion blur or shorter exposure times to freeze motion, you will choose either slower or faster shutter speeds. Your camera will automatically set the aperture to get the correct amount of light on your sensor (exposure). This mode is great if you are shooting sports or want to introduce motion blur to your photos.
Practice: Turn your mode dial to Shutter Priority mode and select a fast shutter speed like 1/500 second. Take a shot of a moving subject (a child, pet, pedestrians) and attempt to freeze motion. Increase the shutter speed if you have to. Then, try with a slower shutter speed and capture motion blur.
Aperture Priority (Av/A)
Most of you who will start shooting in advanced modes most likely will end up in “Av” in 90% of the time and that’s ok! Here you choose the aperture yourself and the camera adjust the shutter speed to get the desired exposure. BY settings the aperture manually, you are in creative control of things like isolating your subject with a blurry background or an image with overall sharpness. Use this mode if you are shooting landscape (large f-number to get a higher depth of field) or portraits (lower f-number to get a shallow depth of field, thereby a blurry background)
Practice: Turn your mode dial to Aperture Priority mode and select a large aperture (small f-number like f/2.8) and attempt to blur the background in your photos. Then turn the dial up to something like f/11 in an attempt to have your background in focus as well.
Manual Mode (M)
With “M” mode, you operate your camera manually and have the full control. When shooting wedding and events, (most likely with a flash) it’s inevitable to use manual mode, as light conditions change constantly. Even if you have time, like in landscape photography, manual mode is the fastest and safest way to go. Adjust your settings until you get the exposure right. And always check your screen and histogram to judge if you got it right!
Tip: Being forced to be aware of your settings and exposure makes you learn rapidly. Plus, you become more creative by having the full control.
Practice: Turn your mode dial to manual mode and start with f/2.8, 1/500sec, and ISO 100. Is your photo overexposed? Try to correct the exposure by adjusting either shutter speed or the aperture. Don’t be afraid to take 20 shots if you have to, it’s free!
Bulb-mode (B)
B stands for Bulb-mode. In this mode, your camera will expose the sensor as long as you hold down the shutter. Why is this useful? As most DSLRs only offer shutter speeds up to 30″ seconds you will use the bulb mode in case you want to expose longer than that. When using Bulb mode, your camera should be mounted on a tripod and you must fire the shutter with a remote control to avoid camera shake.
Use this mode to get a ghost effect (make moving objects invisible) on busy landscapes or smooth out water, clouds…etc.
Practice: Turn your mode dial to Bulb mode and mount your camera on a tripod. Aim to create motion blur (traffic, pedestrians, spinning objects, flowing water) by pressing your shutter speed as long as you want. You will be amazed by the results!
Custom Modes
In Cannon DSRL there are custom mode selectors (C1, C2, and C3) that you can pre-adjust and save all your settings. For Nikon users, in your settings menu, look for a setting named “Shooting Menu Banks” where you can store all your settings under a custom shooting mode name.
Custom modes can be extremely helpful if you are often changing to the same settings. For example, if you do a lot of studio work where you frequently use the exact same lighting setup, you may find them useful. Another example is if you are shooting wildlife. Here, having all your settings in one custom mode allows you to quickly load them all at once and start shooting.
Use The LCD Panel To Set Up Your Camera
Last but not least, I want to give you a brief overview of the LCD panel (usually located on the top). Here you have all the important settings at sight. Illuminate the panel by pushing the light bulb button on the top right.

DSLR camera’s LCD panel can quickly give you information about the settings you are using
What can we see in the panel shown above?
My shutter speed is set on 1/125 of a second, the aperture is f3.5, and the ISO is 800. I have 1027 pictures to go until my memory card is full. Additionally, the white balance (WB) is switched to tungsten light.
WB is a color correction tool. You can choose from different WB settings (daylight, shade, cloudy, flash,…) depending on what your major light source is. The result of correct WB is natural looking colors in your image.
Picture format I am using is RAW. You can choose RAW or JPG. As the RAW format saves much more information, I highly recommend you to shoot in RAW.
Metering mode is set on “centered metering”, meaning my camera will measure the light arriving in the center of the image and calculate an average for the whole scene. Please read more about metering modes in your camera manual as it is essential to photography!
Drive-mode tells you if you are about to fire a single shot or a series of pictures or if you’re using a self-timer.
Exposure level indicator can be found on the LCD panel and inside the viewfinder. It ranges from three stops under to three stops overexposed.
Practice Until It’s Second Nature
I hope I was able to make your DSLR a bit more familiar to you. I know it is a lot of information to take, but don’t be afraid to go deeper. After a while, you will automate the processes and will learn to use the camera intuitively as an extension of your eye and hand. It takes a lot of practice but everybody started where you are today. It’s just a matter of putting in the hours.
The secret is to enjoy the process and not stress over it! After all, digital photography doesn’t cost much after the initial camera investment.